
When upgrading your RAM, different RAM modules can sometimes cause blue screens and system crashes. A recent customer case shows why compatible RAM modules are important and how to avoid problems.

Table of Contents
Why can different RAM modules cause problems for each other?
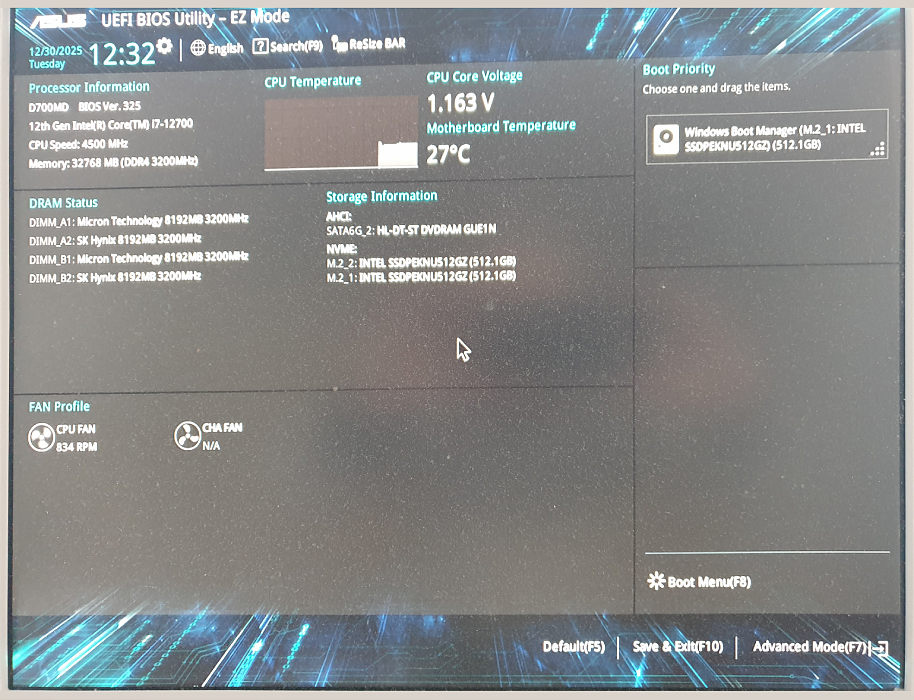
A customer wanted to expand their RAM. Their system already had two Micron RAM modules installed. They also installed two newly purchased Hynix modules, so there were a total of four RAM sticks in the system.
The system’s behavior was confusing at first. In the BIOS, all four RAM modules were detected correctly. However, as soon as Windows started, blue screens occurred and using the PC was not possible. Since the modules were visible in the BIOS, there was initially no obvious hardware defect. Still, the behavior pointed to a problem with how the different memory components were working together.
Why can different RAM modules cause problems for each other?
As a general rule: RAM should ideally always consist of identical modules. Even if two RAM modules look the same on paper (e.g., same capacity and clock speed), there can be internal differences, for example in:
- Memory chips (different manufacturers such as Micron or Hynix)
- Timings
- Voltage
- Sub-timings
- SPD profiles
When different RAM modules cause instability: causes and solutions
When booting, the motherboard automatically tries to find a common configuration for all modules. In most cases, this works without issues. In rare cases, however, it can happen that:
- the motherboard can’t find a stable common configuration
- saved BIOS settings don’t match the new RAM
- different memory chips don’t work together stably
The result can be instability, crashes, or blue screens.
How can you narrow down the cause?
To find out whether there’s a defect or whether it’s purely a compatibility issue, a systematic test is recommended.
In our support case, we recommended the following steps to the customer:
- Test only the new RAM modules.
First, install and test only the new modules—without the existing memory. This helps check whether the new RAM sticks work in principle. - Test modules individually.
Each new module should be tested on its own. This makes it possible to determine whether a single RAM stick might be defective. - Test modules together.
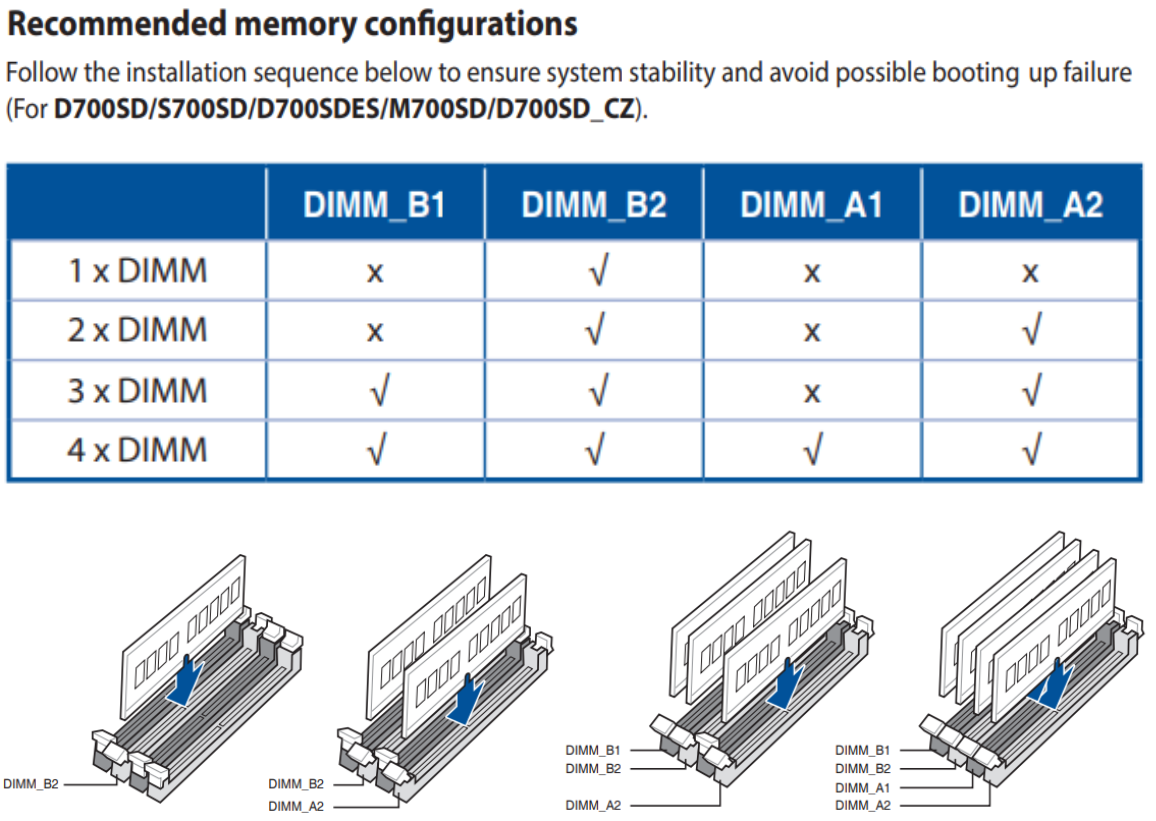
Both new RAM modules should be installed together to check whether they run stably as a pair. - Use the correct slots.
Many motherboards specify a particular order for the RAM slots.
For many systems, for example:
- 1 module: slot B2
- 2 modules: slots B2 + A2
Correct installation is important so dual-channel mode works properly and the system remains stable. (You can find detailed installation instructions for RAM modules in your device manual or directly from the manufacturer).
Other possible solutions
If it turns out that the new RAM modules work without issues individually or as a pair, the cause is usually the combination of different memory manufacturers.
Possible solutions then include:
- Using four identical RAM modules
- BIOS update, if available
- manual adjustment of
– RAM clock speed
– voltage
– timings (more for experienced users)
Conclusion
Combining different RAM modules often works without issues—but it’s not guaranteed. Even if capacity and clock speed match, internal differences between manufacturers can lead to instability.
So if you want to expand your RAM, you should ideally use identical modules from the same manufacturer. This significantly reduces the risk of compatibility issues and ensures stable system operation.
So if your system suddenly crashes or shows blue screens after a RAM upgrade, it’s worth doing a structured test of the individual modules. This way you can quickly find out whether there’s a defect or simply an unfavorable combination of different memory.